Friday, February 26, 2010

Pizza!


Chef Brooke and Chef Chloe

The other day my daughter, Chloe, and her BFF, Brooke, wanted to make homemade pizzas. I checked out what we had in the fridge and whipped up some pizza dough. That afternoon we all had gourmet, personalized pizzas! (And I used up some leftovers in the fridge too!)

Mark Bittman has a very simple and basic pizza dough recipe in his absolutely awesome cookbook, "How to Cook Everything Vegetarian". The book is over 900 pages long and filled to the gills with vegetarian and vegan recipes... Love it!

Mark Bittman's Pizza Dough

3 cups all-purpose flour
2 teaspoons instant yeast
2 teaspoons kosher salt
3 tablespoons extra virgin olive oil, separated
couple pinches of cornmeal (for dusting the cookie sheet)

Combine flour, yeast, and salt in food processor. Process and add 1 cup water and 2 tablespoons of the oil. Process for about 30 seconds, adding more water, a tablespoon at a time, until mixture forms a ball and is slightly sticky.

Turn dough out onto a floured work surface and knead for a few seconds making a smooth, round ball. Put the remaining 1 tablespoon oil in a bowl, put the dough ball in the bowl, and cover with plastic or towel. Let it sit for an hour or two to rise until it doubles in size.

When the dough is ready, turn dough out onto a floured surface, form into a ball and cut into quarters. Cover and let rise again for an additional 20 minutes.


Their master pieces!

Now you can roll out and shape dough into pizzas! This is what we did with ours:

The girls topped each one with Good Grub Basil Pesto. Then they rummaged through the fridge and found some salami, parmesan cheese, a can of sliced olives, and a pack of sun-dried tomatoes. (Totally acceptable and equally delicious without the meat and cheese... of course.)  After baking the finished pizzas at 500 degrees for 8-12 minutes, they brushed the crust with olive oil and gave it a final sprinkling of kosher salt. (That way the crust gets eaten too!)

* Prepare cookie sheets by sprinkling them with cornmeal to prevent sticking. Place pizza doughs on the cookie sheets before adding the toppings.

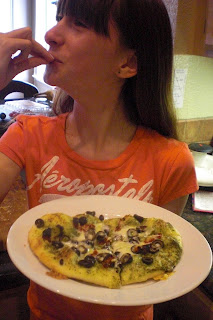
Lunch for me and Marco.


For Marco and myself I topped ours off with the basil pesto, fresh slices of tomatoes, kalamata olives, and parmesan cheese for the hubby. We ate ours with a delicious salad of lettuce greens (from my very own veg garden!), blueberries, pine nuts, and a light lemon dijon vinaigrette (recipe to follow in a future post).

They go together quickly and bake quickly, but you have to account for the time it takes the dough to rise (up to 2 hours). Even though I call these "personal size" pizzas, they are super filling and can easily be shared.


Bellissima!

Saturday, November 14, 2009

The Veg Bed


Last weekend Chloe, Marco, and I put together a raised vegetable garden.  We filled it with, what felt like, a ton of soil.  About 1 1/2 cubic yards, actually.  It was a mixture of organic soil and organic compost.  Mixing it all up was quite the workout!  I really wanted to go completely organic, but the plants were sitting right there in front of me at the nursery and I was dying to see something in the dirt, so I just bit the bullet and bought them.  They aren't organic plants, grown from organic seed, but they are in organic soil and I won't be feeding them any chemical fertilizers.  


I have a small bin with soil, dried leaves, and kitchen scraps.  I've mixed it all up and covered it up with plastic so it can "cook" for the winter.  (An experiment complete with gnats!)  The hope is that it will turn into beautiful dark, rich soil I can use in the bed.  Next, a vermiculture!  Oh, I also have carrots, beets, basil, bok choy, and spinach seeds on the window sill.  They should be ready to plant outside in a few weeks.  I plan to have my second raised veg bed ready by then.

I think I overdid it with the plant buying, since we had to takeover a patch by the bedroom backdoor.  The soil has a ton of clay, which we mixed with soil from the bed, so it'll be interesting to see the difference , if any, in size, appearance, and flavor of the veggies.  Now, it's just a matter of keeping them watered, covered for the frost, and protected from the dog.

Oh yes.  Lulu has rediscovered her favorite past-time.  I thought she had past this phase years ago, but I guess you can't teach an old dog... well, you get it.  The veg beds are now covered in a plastic mesh to deter Lulu from digging them up.  So far, so good.  (But this is getting expensive!)

So, the veg should be ready to harvest by January, maybe a few things by Christmas, fingers crossed.  That's when I plan to start some plants from seed, tomato, zucchini, bells, and more.  I'll be trying out some organic seed from Burpee or The Seed Savers Exchange.  I can't wait to taste it all!

Tuesday, October 27, 2009

Sun Dried Tomato Puree


I was in the mood for something super savory and full of flavor the other day, so I dug out my mini food processor and experimented with my sun dried tomatoes.  What I ended up with was a flavorful, brilliant red puree.  I spread it on some crackers, but it would also work as a topping for baked potatoes.  You could also toss it into some whole wheat pasta! 


Sun Dried Tomato Puree


a big handful of sun dried tomatoes (not the ones packed in oil)

1/2 to 1 whole garlic clove

2-3 T olive oil

juice of 1/2 a lemon

salt and pepper


Put all ingredients into a food processor and whiz it up to a chunky consistency.  It’ll only take a few seconds.  Check for seasonings and that’s it!


Give it a try!

Silky Split Pea Soup


During the summer my little brother graduated from college in Santa Barbara... Yeah! Anyway, while we were there, Marco, Chloe, and I went to a little “mom and pop” restaurant and had some fabulous split pea soup. Chloe and I couldn’t get enough of the stuff and we pretty much fought over who would lick the bowl. It has taken me about four months to finally give it a try. If I knew how easy is was to make split pea soup, I would have done it four months ago!


Special equipment:

immersion blender (a regular blender will also work, but you might want to wait for the soup to cool a little so you don’t end up with green walls!)


Silky Split Pea Soup


2 medium white onions, chopped

1 T Garlic-Chili-Spiked Olive Oil (a Grub recipe), plus extra for garnish

1/2t salt

1/2 t paprika, plus extra for garnish

1/2 t ground ginger, plus extra for garnish

1 32 oz box veg stock

1 cup water

juice of 1/2 lemon, plus extra for garnish

1 16 oz dried split peas


Sauté onions over medium-low heat in 1 tablespoon of Garlic-Chili-Spiked Olive Oil until tender. Add salt, paprika, and ginger and heat through. If the onions get a bit dry, add a drizzle of veg stock and continue to sauté. When onions are nice and soft, add rest of veg stock, water, lemon juice, and split peas. Simmer for 20-30 minutes until split peas are soft.


Now grab your immersion blender and whiz away! You want your soup to be completely creamy and silky. Serve with a sprinkle of paprika and ginger, a drizzle of fresh lemon juice and a douse of Garlic-Chili-Spiked Olive Oil.


So, there you have it! Grab a big hunk of whole grain bread and there’s dinner. Great for this cool autumn weather.

Sunday, October 25, 2009

My new raised veggie garden bed!


This is soooo cool!  Marco finished the garden bed and it looks awesome!  (I helped a little.)  Not including running to the store a couple of times, it ended up being a three-hour job.  Thank goodness it wasn't a hot day.  It can get up into the 100's out here.  

We'll be covering the surrounding dirt with gravel and filling it up with organic soil and compost.  (Next pay check.)  It may take a little hunting around these parts to find a place who sells organic soil.  

This reminds me a little of that show Good Neighbors, from England.  I loved that show!  Watch out Barbara, you may have some competition soon!

Thank you Marco!


Roasted Butternut Squash and Grapes with Rice and Beans


Inspired by a newfound web site, The Garden Girl, I talked Marco into helping me built a really nice raised bed for my future veggie garden.  (Well, I’ve got to give Marco most of the credit; he did all of the “heavy lifting”.)  I can’t wait to fill it with rich organic soil and compost and start growing some great Grub!  Not like I know what I’m doing.  I think I’ll just learn as I go.

After all that hard work we were starving.  By 1:30 it was time for lunch.  I had thrown some butternut squash, baby carrots, and some grapes in the oven to roast around 12:30.  They turned out perfect, and to my surprise, the grapes were delicious!  I then made a complete meal by tossing them with some left over rice and beans.  Here’s what I did...

Roasted Butternut Squash and Grapes with Rice and Beans (E2L friendly)

1 medium butter nut squash, peeled and cut into 1” cubes
a large handful of baby carrots
a large handful of sweet green grapes
1T olive oil 
salt and pepper

1-2 cups of leftover brown rice
1/2 a can of black beans, drained and rinsed
1/2 a can of kidney beans, drained and rinsed
2T chopped pecans
a drizzle of Citrus Chipotle Sauce (a Grub recipe), or use your favorite vinaigrette
spinach leaves

Toss the squash, carrots, onion, grapes with the olive oil, salt, and pepper.  Roast at 400 degrees for 45 minutes, tossing half way through.  Slightly cool on counter.

Now lightly toss the squash mixture with the rice, beans, and pecans.  (Leftover brown rice can be a little hard.  You may want to add a drop of water and microwave for 30 seconds to soften it up.)  Dress with Citrus Chipotle Sauce or your favorite vinaigrette and spoon over a nice big bed of spinach.


Variation:
Switch out the butternut squash for sweet potato.  Use another salad green in place of the spinach.  If you have something comparable in the fridge or pantry, use that first before you make a special trip to the grocery store.  Keep it simple!

I can’t wait to make these kinds of dishes with my home grown produce.  Then Marco will see it was well worth the effort and maybe I can talk him into expanding the vegetable garden!

Saturday, October 24, 2009

Citrus Chipotle Sauce


I’ve read a few books on nutrition. Most of them are off the beaten path, Eat to Live, China Study, Food Matters. I’m really drawn to the whole vegan approach, however, I like to make recipes where it’s easy to incorporate some animal products, if desired. Dr. Fuhrman’s books, Eat to Live, and Eat for Health, are really influencing me at the moment and have inspired a few new recipes.


Here’s a delicious, refreshing sauce you can use to top a big bowl salad greens, raw pumpkin seeds and avocado, or warm roasted sweet potatoes and carrots.


Citrus Chipotle Sauce (E2L friendly)


4 garlic cloves

1T agave nectar

2 cups fresh orange juice

1/3 cup fresh lime juice

1-2 chipotle peppers

veg stock... maybe


Blend in all ingredients, except for veg stock, in a blender until smooth. Pour in a pot and simmer on medium heat until the sauce is reduced by half. If too thick, add enough veg stock to get the desired consistency and simmer for another 3-5 minutes. Reducing the sauce will mellow the garlic and make the rest of the flavors more intense. It will also thicken the sauce. Strain in a fine mesh sieve.


Tips:

Using fresh orange and lime juice instead of the bottled junk will make a HUGE difference in the outcome of this recipe.


When I buy a can of chipotle peppers, which are just roasted jalapeno peppers in adobo sauce, I put the leftovers in a zip sandwich bag, flatten it out, and freeze them for further use.


For more information on Eat to Live, check out Dr. Fuhrman’s web site at